When developing a WordPress theme it’s important to consider the benefits of localisation, this alone will open your theme up to the widest possible audience. In this tutorial I am going to show you how easy it is to include localisation support.
WordPress uses the GNU internationalisation and localisation library known as gettext. This library provides a standard way for developers to mark strings in code as being suitable for localisation.
Localise theme strings
Firstly you will need to wrap each localisable string in your theme with one of WordPress’s translation functions. This step can be quite laborious if left till later in the development of your theme so I encourage you to do this as you progress through the development.
WordPress has a wealth of functions available that can be used by theme authors to specify a string as translatable. There are only really two of these functions we’re going to worry ourselves with for the sake of keeping this tutorial simple.
Firstly there’s __(), which simply returns the translated string. This is useful if you want to assign the string to a variable or pass it as a argument to a function.
|
1 |
__('Text to translate', 'textdomain'); |
The second function is _e(), which is basically the same as __() except it prints the translated string directly to the page.
|
1 |
_e('Text to translate', 'textdomain'); |
The first argument in both of these functions is the text you want to mark as translatable and the second argument is the text domain, a unique identifier that WordPress uses to distinguish between all of the loaded translations. The text domain is optional, but I highly recommend you include it as it helps to prevent collisions with other translations that may have been loaded for any installed plugins.
A good convention is to use your themes folder name as the text domain, so if your theme was named “Embellish” then your text domain would be “embellish”. Obviously there may be instances where an installed plugin shares this text domain causing translation issues, so you may also want to append your initials to the text domain.
Let’s assume you have this code somewhere in your theme:
|
1 2 3 4 |
<article class="hentry"> <h2>This is my post title</h2> <p>This is my post content.</p> </article> |
What you need to do is wrap the strings in either __() or _e() like in the example below.
|
1 2 3 4 |
<article class="hentry"> <h2><?php _e( 'This is my post title', 'embellish' ); ?></h2> <p><?php _e( 'This is my post content.', 'embellish' ); ?></p> </article> |
WordPress now understands that these strings are localisable, but there’s still a little more work left for us to do.
Use Poedit to generate a POT file
Now you’ll need to download Poedit, which can be found here. Poedit is a cross-platform application used for editing gettext catalogs and can produce the following files:
- POT (Portable Object Template) – This file is what we’ll be creating and is used by translators to translate your theme. It contains a list of all strings that need a translation
- PO (Portable Object) – This file will be edited by translators and used to generate the MO file
- MO (Machine Object) – This is the file that translators will generate and WordPress will use to translate your theme
In this tutorial we only need to create the POT file, as this will serve as a template for the translators so they can translate our theme. They will be responsible for creating the PO and MO files that WordPress will then use to display the translations.
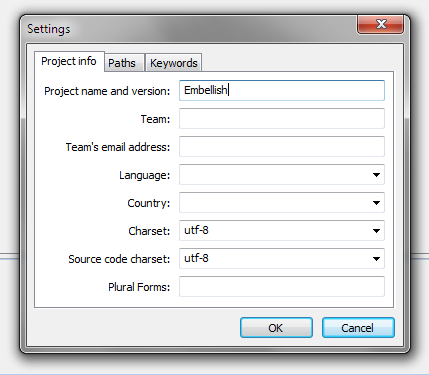
Start Poedit and click “File -> New Catalog”. When the “Settings” dialog appears enter your projects name, I have used my themes name “Embellish” and set both the charset and source code charset to “utf-8”.
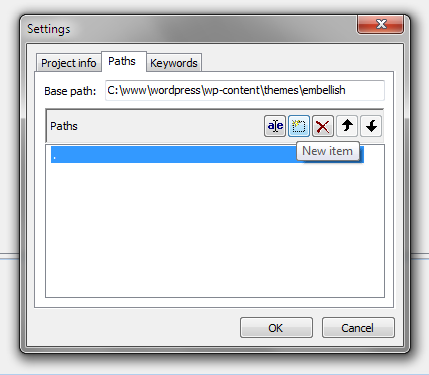
Switch to the “Paths” tab and enter the base path to your themes root directory, then click the “New Item” icon to add a new path and enter “.”. This will tell Poedit to scan the themes root directory and all subdirectories for source files.
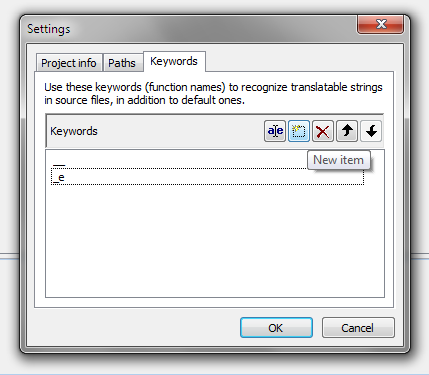
Switch to the “Keywords” tab, remove any default keywords by selecting the keyword in the list and clicking “Delete Item”. Now we need to enter the function names we used to wrap our strings with earlier, click “New Item” and enter “__”, do the same for “_e”.
Click “OK” and on the “Save” dialog set the file name to your chosen text domain and append a “.pot” extension, in my case I named my file “embellish.pot”. Then save it somewhere in your themes directory, I recommend saving it inside a “languages” directory in the theme root to save the theme root directory becoming cluttered with translation files.
Poedit will by default save a MO file alongside your POT file. This file is redundant and will not be needed by translators or WordPress so you may delete it.
Now that the POT file has been saved, navigate to “Catalog -> Update from sources” and let Poedit generate a list of localisable strings. Once the process is complete an “Update summary” dialog will appear notifying you of any new or obsolete strings, click “OK” and then save the POT file by navigating to “File -> Save” (Note that Poedit will generate the MO file every time you save your POT file so you may wish to keep deleting it after each save).
Tell WordPress that your theme supports localisation
WordPress now needs to know that your theme supports translations and where it can load them from if they exist. To do this simply add the following line to your themes “functions.php” file.
|
1 |
load_theme_textdomain( 'embellish', TEMPLATEPATH . '/languages' ); |
The load_theme_textdomain() function will load the themes translated strings if they exist. The first argument is the text domain you chose previously and the second argument is the path to the translations.
Updating the POT file after updating your theme
After adding new strings to your theme you will need to update your POT file so that it can be used to translate the new strings. To do this simple fire up Poedit and navigate to “File -> Open” and open your themes POT file (You may need to change the file filter to “All Files” for your file explorer to display the POT files as Poedit filters the list to PO files by default).
Navigate to “Catalog -> Update from sources” and the new strings will be added to the catalog. Click “OK”, save the POT file and rejoice in a job well done!
Now your WordPress theme should have full localisation support. Hope you enjoyed this tutorial!